In this article I will show you which steps you need to do to secure your root server. It consists of the general practises of setting up and the detailed implementation on Debian Buster.
Change the SSH port to a custom one
Most attackers try to find an open SSH port on the default port number (which is 22) and will pass by if there is no open port. So you definitely should change the port number of your SSH connection.
Open /etc/ssh/sshd_config with your favorite editor and set following line:
Port XXXXXXXX is the placeholder for the portnumber you want the ssh server to listen for connections on.
Now restart the SSH daemon service:
service ssh restartDon’t close the existing SSH connection and try to login with a new SSH connection using the new configuration. If you can successfully login you can close the previous SSH connection.
Setup cooldown after failed logins
To prevent Bruteforce and Dictionary attacks you should setup the server to reject logins for a user account for some time if the user failed a given amount of login attempts in a row.
You can achieve this by using fail2ban. Run
apt-get install fail2banto install it. Check that it is running:
systemctl status fail2ban.servicethe output should look like this:
● fail2ban.service - Fail2Ban Service
   Loaded: loaded (/lib/systemd/system/fail2ban.service; enabled; vendor preset:
   Active: active (running) since Sun 2022-08-28 23:10:03 CEST; 7min ago
     Docs: man:fail2ban(1)
 Main PID: 971 (fail2ban-server)
    Tasks: 3 (limit: 105)
   Memory: 14.0M
   CGroup: /system.slice/fail2ban.service
           └─971 /usr/bin/python3 /usr/bin/fail2ban-server -xf start
Configure Fail2Ban
To configure fail2ban create a file in /etc/fail2ban/jail.d by copying /etc/fail2ban/jail.conf:
cp /etc/fail2ban/jail.conf /etc/fail2ban/jail.d/temporary-block-account-on-failed-logins.localNow open the created file with your favorite text editor and edit the rules according to your needs:
nano /etc/fail2ban/jail.d/temporary-block-account-on-failed-logins.localRemove the warning that says that you should not modify that file to avoid confusions when you need to edit the file on a later point in time, as it relates to the jail.conf file, not the files within jail.d.
Also don’t forget to active Fail2Ban for the sshd by uncommenting or adding the line
enabled = true
within the sshd section of your created rule file.
The default settings block an ip address on all ports for 10 minutes after 5 failed login attempts within the last 10 minutes.
For more details on the settings within the rule file you can take a look on this links:
After finishing the rule configuration you need to restart Fail2Ban:
systemctl restart fail2banSend email notification on failed login attemps
If an IP address gets blocked for too many failed login attempts the server should notify you by sending an email to you for further investigation.
First install Sendmail:
apt-get install sendmail sendmail-cf m4And configure it:
sendmailconfigThe default config is already fine for sending emails. If you don’t want sendmail to handle incoming emails you should close all unneeded ports except for port 25. Take a look at the section „Close unneeded ports“ on how to achieve this.
Now to setup fail2ban to send the notification email when an account is banned, open the configuration file you created in the previous step:
nano /etc/fail2ban/jail.d/temporary-block-account-on-failed-logins.localLook for the line defining the „action“ key:
action_ = %(banaction)s[name=%(__name__)s, bantime="%(bantime)s", port="%(port)s", protocol="%(protocol)s", chain="%(chain)s"]
And change it to:
action = %(action_mwl)s
or
action = %(action_mw)s
Depending on how much detail about the incident you want the notification email to contain.
Make sure that the values of the action_mw and action_mwl keys below does not contain the following String:
$(action_)sAs that would lead to following error message:
Recursion limit exceeded in value substitution: option 'action' in section 'sshd' contains an interpolation key which cannot be substituted in 10 steps. Raw value: '%(action_)s'
Now look for the line defining the „destemail“ key:
destemail = root@root
And change its value to the email address you want the notification email to be sent to.
Also look for the „sender“ key:
sender = root@<fq-hostname>
And change its hostname (the part behind the @) to the full qualified domain name of the machine which will send the notification email.
Now restart fail2ban to activate your new config settings and start the fail2ban client:
systemctl restart fail2ban
fail2ban-client start
When you receive an error message like this:
2025-08-17 13:34:27,476 fail2ban.configreader   [880]: WARNING 'allowipv6' not defined in 'Definition'. Using default one: 'auto'
2025-08-17 13:34:27,481 fail2ban                [880]: ERROR   Failed during configuration: Have not found any log file for sshd jail
you need to install rsyslog:
apt install rsyslogAnd restart sshd, fail2ban and fail2ban-client:
systemctl restart sshd
systemctl restart fail2ban
fail2ban-client startNow you can check that everything works correctly by opening another SSH terminal and try to connect to the server with wrong credentials 6 times.
You now should have received an email notifying you that your IP address has been blocked. You can list all currently blocked IPs by using your existing SSH connection:
fail2ban-client status sshdThe output should look similar to this:
Status for the jail: sshd
|- Filter
|  |- Currently failed: 0
|  |- Total failed:     5
|  `- File list:        /var/log/auth.log
`- Actions
   |- Currently banned: 1
   |- Total banned:     1
   `- Banned IP list:   xxx.xxx.xxx.xxx
Now run the following command to unblock the IP manually:
fail2ban-client set <jailname> unbanip <ipaddress>In the example jailname is „sshd“ and IP address is the IP address you want to unblock.
Close unneeded ports
You should close all ports in your firewall except those which are used by services you want to be available to the public. This significantly reduces the amount of services that might be attacked.
For this, you need to install UFW:
apt-get install ufwBlock all incoming traffic:
ufw default deny incomingAllow all outgoing traffic:
ufw default allow outgoingNow allow all ports where your server shall listen to incoming traffic. At least you need to allow the SSH port to be able to access the server:
ufw allow xxxxYou need to run this command for every service you wish to allow to be accessed from external systems.
Now enable UFW:
ufw enableYou can see the ufw configuration with following command:
ufw statusThe output contains the list of all defined rules. It looks similar to this:
Status: Aktiv

Zu                         Aktion      Von
--                         ------      ---
5551                       ALLOW       Anywhere
80                         ALLOW       Anywhere
443                        ALLOW       Anywhere
5551 (v6)                  ALLOW       Anywhere (v6)
80 (v6)                    ALLOW       Anywhere (v6)
443 (v6)                   ALLOW       Anywhere (v6)
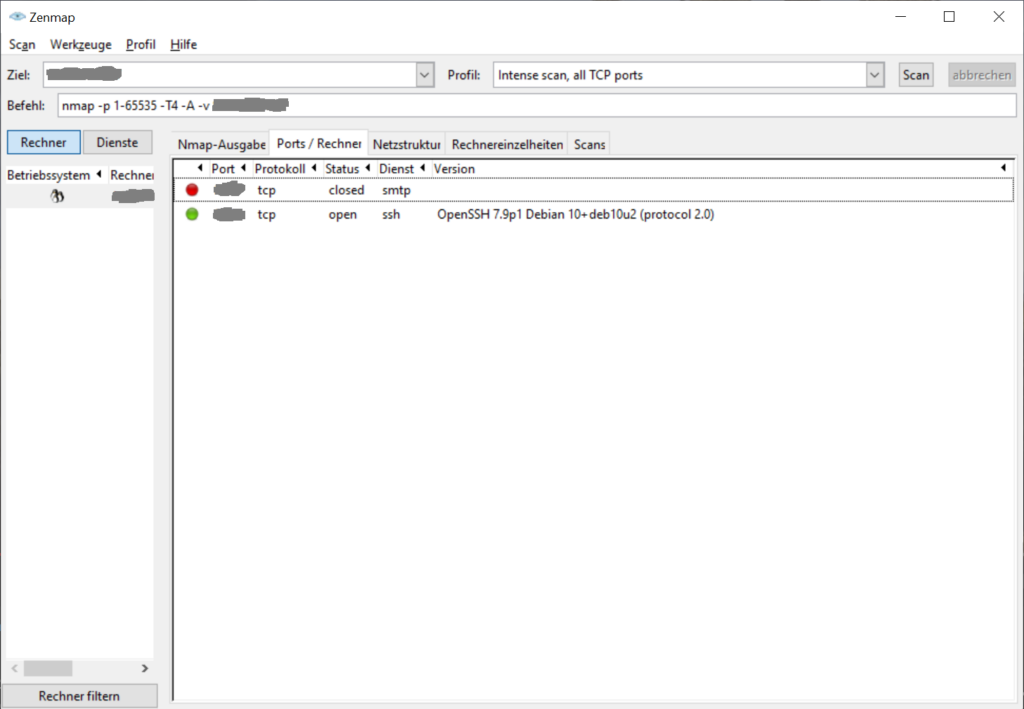
To check if all ports are closed correctly you can run a port scanner such as Nmap. For Windows I suggest using Zenmap, a graphical frontend for Nmap:
For more details you can take a look at UFW tutorial at digitalocean.com.
Send notification email on SSH login
You should configure your server to send a notification email when someone successfully logs in via SSH so that you will know if your server has been hacked. For this, first create a script „notify-ssh-login.sh“:
if [ -n "$SSH_CLIENT" ]; then
{
  IPADDR="$(echo $SSH_CLIENT | awk '{print $1}')"
  echo "Subject: [$$CATEGORY$$] SSH Login: ${USER} from ${IPADDR}"
  echo ""
  echo "User ${USER} logged in via SSH from ${IPADDR} onto $(hostname -f)".
} | sendmail -f "$$CATEGORY$$ <root@$$HOSTNAME$$>" $$RECIPIENT$$
fi
Replace $$HOSTNAME$$ with the hostname of your Gitlab server, $$CATEGORY$$ with the category (for example „Gitlab Runner“) and $$RECIPIENT$$ with the mail address to send the log to.
Now set the x-bit to make it executable:
chmod +x notify-ssh-login.shNow run the script to test it. You should receive an email that not yet contain location data, since it was not called while an SSH login.
Now set a symlink in /etc/profile.d to your notify-ssh-login.sh to run the script when a user logs in:
cd /etc/profile.d
ln -s ~/notify-ssh-login.shKeep your server up to date
You need to regularly update all services and applications that you run on the server to ensure, that possible critical vulnerabilities are getting patched as soon as possible.
First update the package list:
sudo apt-get updateAnd then install all updates:
sudo apt-get upgradeYou need will be asked if you want to install the packages. Input „y“ followed by the return key to ackknowledge.
Maybe you want to automatically update the server. On Debian and Ubuntu you can use the package unattended-upgrades which is a quick and convenient way to set this up. For other linux distributions you might need to set up a chronjob.
Approach 1: Using package „unattended-upgrades“
First you need to install the package:
sudo apt install unattended-upgradesNow show the configuration dialog:
sudo dpkg-reconfigure -plow unattended-upgradesYou will be asked if automatic upgrades shall be activated. Select „yes“.
Some useful basic configuration
Now you probably want to configure your unattended upgrades to your needs. For this, open the 50unattended-upgrades file:
sudo nano /etc/apt/apt.conf.d/50unattended-upgradesI suggest to activate the MinimalSteps option by uncommenting (or adding) the following line:
Unattended-Upgrade::MinimalSteps "true";
This will split unattended upgrades into the smallest possible steps so that the server can be shutdown with a much smaller delay when an unattended upgrade is running currently.
Additional settings when setting up a server
You may also want to be notified via E-Mail about the unattended upgrades. For this, uncomment following line:
Unattended-Upgrade::Mail "";
And set the email address of the receiver of the notification mail:
Unattended-Upgrade::Mail "user@example.de";
You should also specify in which situations you would like to be notified. I suggest to be notified when there was an error or when there were packages updated:
Unattended-Upgrade::MailReport "on-change";
Since a server is not regularly shutdown, you should also configure the unattended-upgrades to automatically restart the server at a given daytime when this is required after an update.
For that, first enable automatically restarting when package updates require it:
Unattended-Upgrade::Automatic-Reboot "true";
At the moment this means that the server will be immediately shutdown when an installed update require a reboot. Since it would be annoying having the server restarting when there is currently productive workload, we should also specify a time when that automatic reboot will occur:
Unattended-Upgrade::Automatic-Reboot-Time "01:00";
Final checks
Now make a first try run to check if unattended upgrade can be called:
sudo unattended-upgrades --dry-run --debugYou should receive an output that looks similar to this:
Starting unattended upgrades script
Allowed origins are: origin=Debian,codename=bookworm-updates, origin=Debian,codename=bookworm,label=Debian, origin=Debian,codename=bookworm,label=Debian-Security, origin=Debian,codename=bookworm-security,label=Debian-Security, origin=Raspbian,codename=bookworm,label=Raspbian, origin=Raspberry Pi Foundation,codename=bookworm,label=Raspberry Pi Foundation
Initial blacklist:
Initial whitelist (not strict):
Using (^linux-.*-[1-9][0-9]*\.[0-9]+\.[0-9]+-[0-9]+(-.+)?$|^kfreebsd-.*-[1-9][0-9]*\.[0-9]+\.[0-9]+-[0-9]+(-.+)?$|^gnumach-.*-[1-9][0-9]*\.[0-9]+\.[0-9]+-[0-9]+(-.+)?$|^.*-modules-[1-9][0-9]*\.[0-9]+\.[0-9]+-[0-9]+(-.+)?$|^.*-kernel-[1-9][0-9]*\.[0-9]+\.[0-9]+-[0-9]+(-.+)?$|^linux-.*-[1-9][0-9]*\.[0-9]+\.[0-9]+-[0-9]+(-.+)?$|^kfreebsd-.*-[1-9][0-9]*\.[0-9]+\.[0-9]+-[0-9]+(-.+)?$|^gnumach-.*-[1-9][0-9]*\.[0-9]+\.[0-9]+-[0-9]+(-.+)?$|^.*-modules-[1-9][0-9]*\.[0-9]+\.[0-9]+-[0-9]+(-.+)?$|^.*-kernel-[1-9][0-9]*\.[0-9]+\.[0-9]+-[0-9]+(-.+)?$) regexp to find kernel packages
Using (^linux-.*-6\.1\.0\-rpi4\-rpi\-v8$|^kfreebsd-.*-6\.1\.0\-rpi4\-rpi\-v8$|^gnumach-.*-6\.1\.0\-rpi4\-rpi\-v8$|^.*-modules-6\.1\.0\-rpi4\-rpi\-v8$|^.*-kernel-6\.1\.0\-rpi4\-rpi\-v8$|^linux-.*-6\.1\.0\-rpi4\-rpi\-v8$|^kfreebsd-.*-6\.1\.0\-rpi4\-rpi\-v8$|^gnumach-.*-6\.1\.0\-rpi4\-rpi\-v8$|^.*-modules-6\.1\.0\-rpi4\-rpi\-v8$|^.*-kernel-6\.1\.0\-rpi4\-rpi\-v8$) regexp to find running kernel packages
pkgs that look like they should be upgraded:
Fetched 0 B in 0s (0 B/s)
fetch.run() result: 0
Packages blacklist due to conffile prompts: []
No packages found that can be upgraded unattended and no pending auto-removals
The list of kept packages can't be calculated in dry-run mode.
If you have configured sending notification emails, you should run unattended-upgrades now to check if the mail is correctly send (if you have set up sending notification emails). First set Unattended-Upgrade::MailReport in /etc/apt/apt.conf.d/50unattended-upgrades to „always“ to make sure that the notification email is actually send even when there are no updates available:
Unattended-Upgrade::MailReport "always";
Now run the command:
sudo unattended-upgrades -dYou received the email in the configured email address? Nice, that means your unattended upgrades are set up correctly and you should now set Unattended-Upgrade::MailReport to its original value.
Approach 2: Using a chronjob
First create the script file update-server.sh at a location you like with following content:
#!/bin/bash
LOGFILE=update-server.log
cd "$(dirname "$0")"
echo "Logs:" > $LOGFILE
echo "Working directory set to $(dirname "$0")" | tee -a $LOGFILE
(apt-get update && apt-get upgrade -y) 2>&1 | sed 's/^/  /' | tee -a $LOGFILE
{
  echo "Subject: [$$CATEGORY$$] Server update report"
  echo ""
  echo "$(cat $LOGFILE)"
} | sendmail -f "$$CATEGORY$$ <root@$$HOSTNAME$$>" $$RECIPIENT$$
Replace $$HOSTNAME$$ with the hostname of your Gitlab server, $$CATEGORY$$ with the category (for example „Gitlab Runner“) and $$RECIPIENT$$ with the mail address to send the log to.
Now set the x-bit to make it executable:
chmod +x update-server.shNow test run the script. You should receive an email with the logs.
Now open the /etc/crontab file and add following line:
0 0 * * * root /srv/apt/update-server.sh
The update could get stuck when an upgrade provides a new version of a config file that you have changed manually, because Dpkg in this case will ask what to do. To prevent this error from occuring, you can create a file „70changedconffile“ in /etc/apt/apt.conf.d:
Dpkg::Options {
  "--force-confdef";
  "--force-confold";
}
This will ensure that Dpkg will automatically keep the manually changed config files without further asking.