In this tutorial I will explain how to setup a Gitlab instance on your own server. Gitlab is a webfrontend for Git that allows you to manage Git repositories. It includes CI/CD pipelines for automatically building and deploying your application, a Wiki system for publishing documentation for your projects and a ticket management system.
Install Docker
Gitlab is available as a Docker image on the Docker Hub. I will go for this as it has several advantages over the package based installation method which is also available:
- The environment needed for Gitlab to run is included in the Docker image, so no need to separately setting up a webserver and other stuff that is used by Gitlab
- Gitlab can be updated easily by just restarting the Docker container when you start it with the tag „latest“
- Better isolation between the Gitlab installation and the host OS of the server
For this you need to setup Docker as described at docs.docker.com.
Now check that docker is working by running the hello-world container:
docker run hello-worldThe output should look like this:
Hello from Docker!
This message shows that your installation appears to be working correctly.

To generate this message, Docker took the following steps:
 1. The Docker client contacted the Docker daemon.
 2. The Docker daemon pulled the "hello-world" image from the Docker Hub.
    (amd64)
 3. The Docker daemon created a new container from that image which runs the
    executable that produces the output you are currently reading.
 4. The Docker daemon streamed that output to the Docker client, which sent it
    to your terminal.

To try something more ambitious, you can run an Ubuntu container with:
 $ docker run -it ubuntu bash

Share images, automate workflows, and more with a free Docker ID:
 https://hub.docker.com/

For more examples and ideas, visit:
 https://docs.docker.com/get-started/
Install Docker Compose
Docker Compose is a Docker tool that allows to create a run configuration for docker containers. You can run Gitlab without it, but you will always be needed to manually provide the necessary environment configuration via shell parameters when starting the container. So when you setup Docker Compose with a run configuration file, Docker Compose will provide the necessary shell parameters to Docker.
An instruction on how to install Docker Compose is provided on linuxize.com.
Setup Gitlab
Switch to the folder in which you want to place the configuration, data and logs of your Gitlab installation:
cd /srv/gitlabFirst setup an .env file in your gitlab configuration folder. This will be used to specify all environment variables that are to be used within the docker-compose.yml file later on. Your .env file should at least contain the GITLAB_HOME key:
GITLAB_HOME=/srv/gitlab
Now create the docker-compose.yml file:
version: '3.6'
services:
  web:
    image: 'gitlab/gitlab-ee:latest'
    container_name: gitlab
    restart: always
    hostname: gitlab.marvin-haagen.de
    environment:
      GITLAB_OMNIBUS_CONFIG: |
        external_url 'https://gitlab.marvin-haagen.de'
        puma['worker_processes'] = 7
        # Add any other gitlab.rb configuration here, each on its own line
    ports:
      - '80:80'
      - '443:443'
    # - '22:22'
    volumes:
      - '$GITLAB_HOME/config:/etc/gitlab'
      - '$GITLAB_HOME/logs:/var/log/gitlab'
      - '$GITLAB_HOME/data:/var/opt/gitlab'
    shm_size: '1024m'
The keys have following meanings:
- hostname: The full qualified domain name of your server
- restart: Always means, that the container is always restartet when it stops (except the user manually stops it from command line)
- external_url: The external URL of your Gitlab installation. This is used as the base URL for the links within the webfrontend that allow to clone the repository, view files etc.
- ports: The ports that shall be mapped from the container to the host.
- volumens: Gitlab has separate directories for the logs, the config and the data, which should be mapped to the host as volumes.
- shm_size: The size of the device /dev/shm that is assigned to the container. The Gitlab team recommends a size of 256 or 1024 Megabyte.
- puma[‚worker_processes‘]: The amount of threads the integrated webserver uses. You should set this value to the amount of CPU cores on your server plus one.
As show in the above example file, you should specify a memory limit for your Gitlab container to make sure that your OS is not going to kill Docker or other important services when the container is under heavy load. If you are unsure which limits to set for the Gitlab container you can take a look at this tables from irbbarcelona.org:
CPU requirements
| CPU cores | Maximum amount of users |
| 1 | works supports up to 100 users but the application can be a bit slower due to having all workers and background jobs running on the same core |
| 2 | recommended number of cores and supports up to 500 users |
| 4 | supports up to 2,000 users |
| 8 | supports up to 5,000 users |
| 16 | supports up to 10,000 users |
| 32 | supports up to 20,000 users |
| 64 | supports up to 40,000 users |
Memory requirements
| Memory limit | Maximum amount of users |
| 1GB RAM + 1GB swap | supports up to 100 users but it will be very slow |
| 2GB RAM | recommended memory size for all installations and supports up to 100 users |
| 4GB RAM | supports up to 1,000 users |
| 8GB RAM | supports up to 2,000 users |
| 16GB RAM | supports up to 4,000 users |
| 32GB RAM | supports up to 8,000 users |
| 64GB RAM | supports up to 16,000 users |
| 128GB RAM | supports up to 32,000 users |
Open ports
You need to open the ports for HTTP and HTTPS in the firewall of your server to be able to access the gitlab instance. Install UFW and run following commands:
ufw allow 80
ufw allow 443
ufw reloadNow you can start your Gitlab instance for the first time to check if it can be accessed through HTTP and HTTPS:
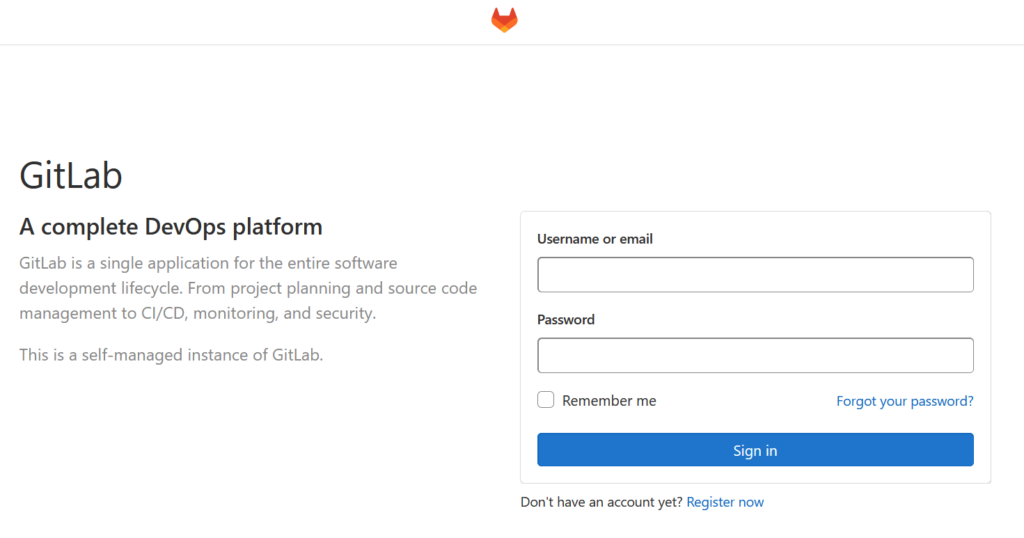
docker compose up -dIt can take up to about 4 Minutes after the container start until the Gitlab frontend is initialized. Then it should look like this:
Since the Gitlab Docker image is bundled with a Let’s Encrypt instance, it is already configured with a free SSL certificate and capable of being used with HTTPS. You can set it up with your own SSL certificate, but I will not cover this in this tutorial.
Configure Gitlab
The remaining configuration is mostly done via the webfrontend of your Gitlab.
First you need to setup a user account. For this, click on „Register now“ and enter your information:
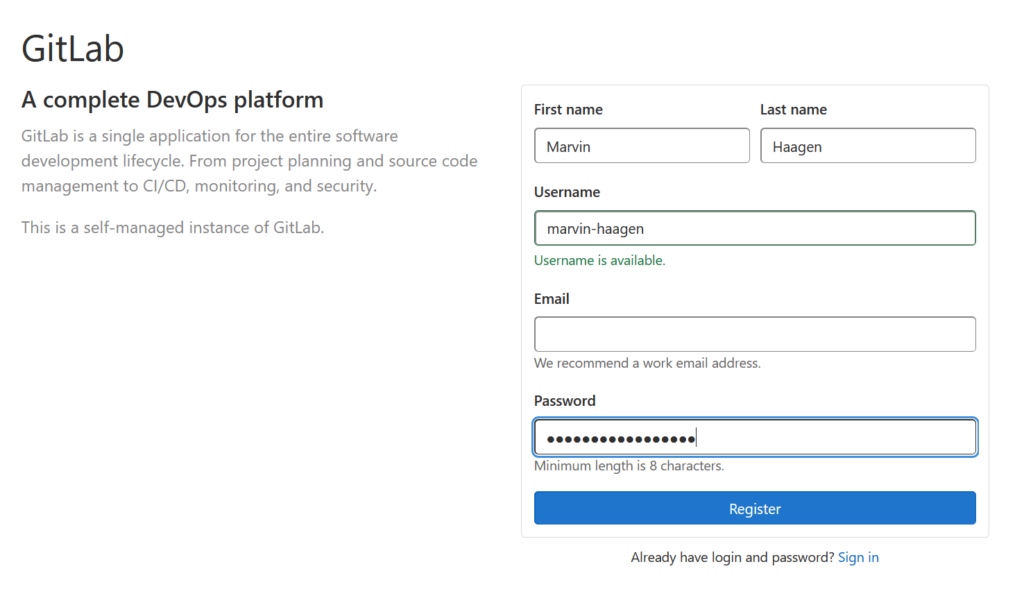
Now after clicking „Register“ you will see a message on top of the screen that admin approval is required for your created account.
Change your root password
So you need to login as root at the sign in screen with the initial root password, which you can retrieve by running the following command via SSH on your Gitlab server:
docker exec -it gitlab grep 'Password:' /etc/gitlab/initial_root_passwordNow after successfully signing in as root you should change your initial root password as the initial_root_password file will be automatically deleted by Gitlab after 24 hours.
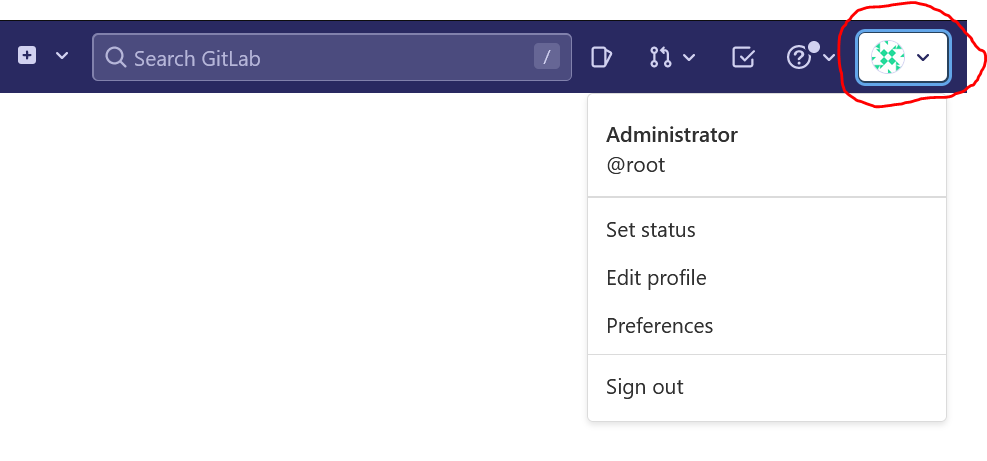
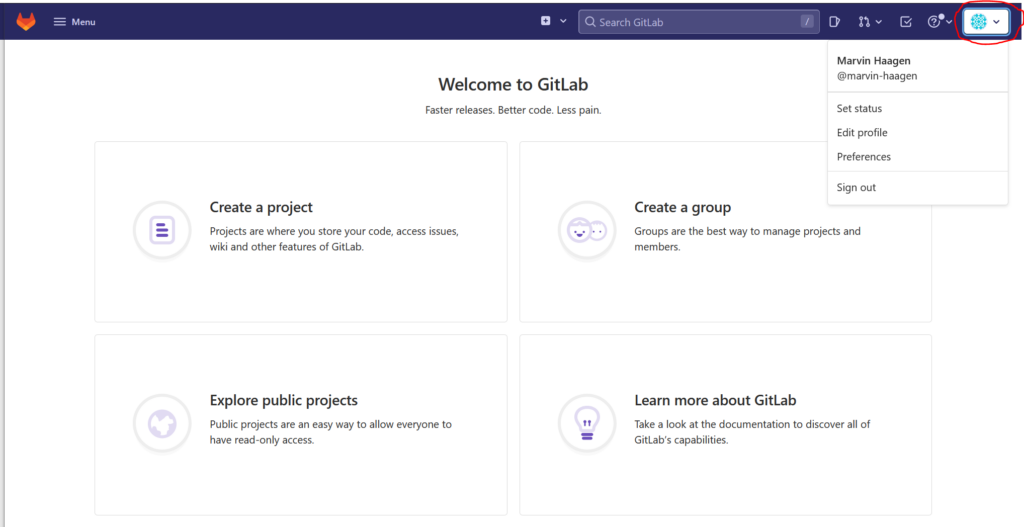
For this, click on the right corner of the screen on your randomly generated user icon to open the user menu:
Click at „Preferences“ and on the following screen click in the left menu bar on „Password“. Now enter your credentials:
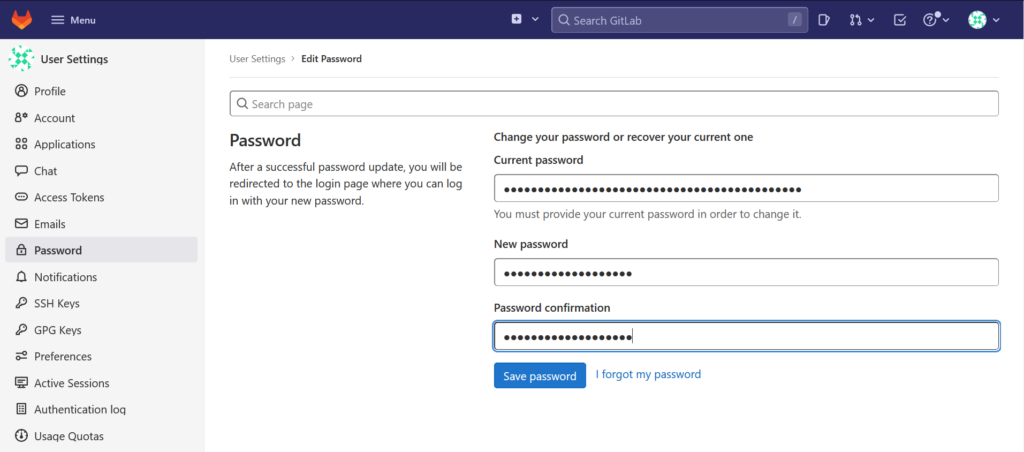
After clicking on „save password“ you will be logged out by Gitlab.
Ackknowledge your new user account
Login again as root on the webfrontend using your new password to ackknowledge your new user account.
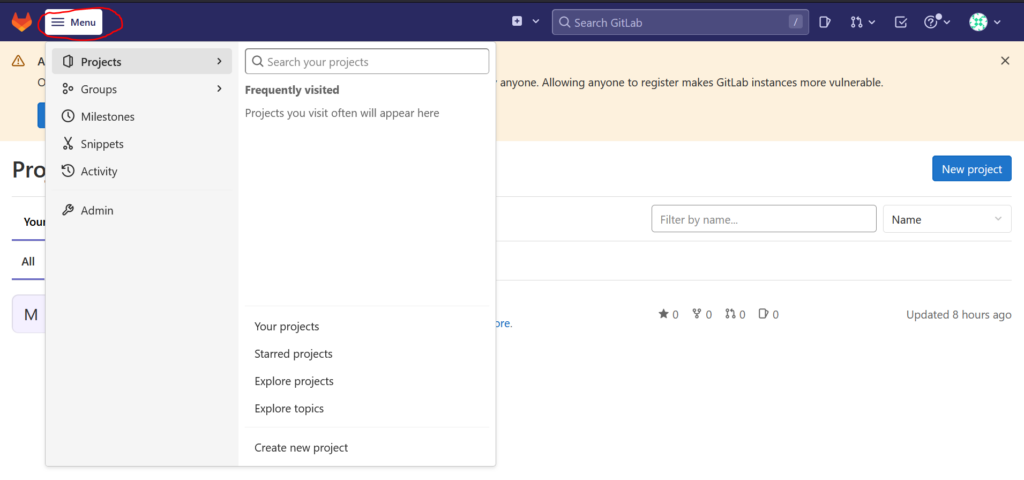
For this, open the main menu by clicking on „menu“ in the left corner of the page and then on „Admin“:
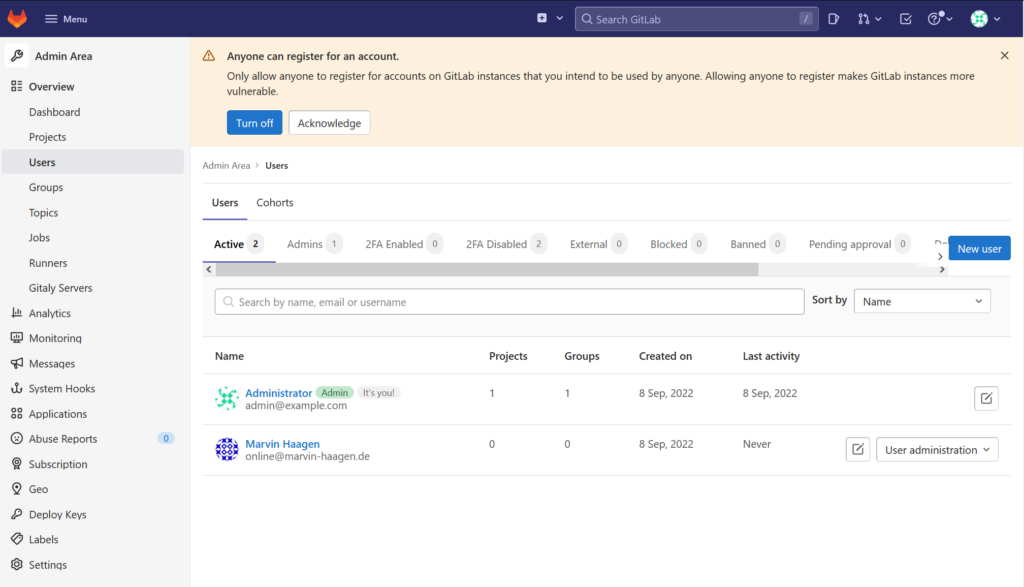
In the left menu bar click on „Users“ and select the tab „Pending approval“. Look for the user name you have created and then click on „User administration“ next to it. A menu opens where you can approve or reject the user. Click „approve“:
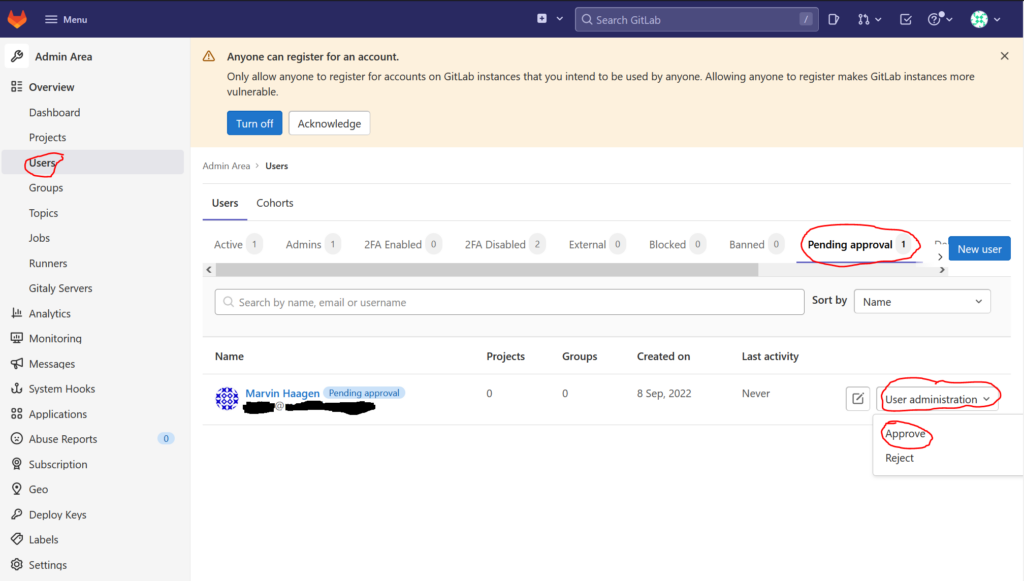
On the shown dialog click again „approve“. Now your user account is visible within the „Active“ tab:
Disable user registration
For preventing to be spammed with user registration requests, you should disable the registration of new users. After it, you can still add new users manually within the Users menu of your admin account.
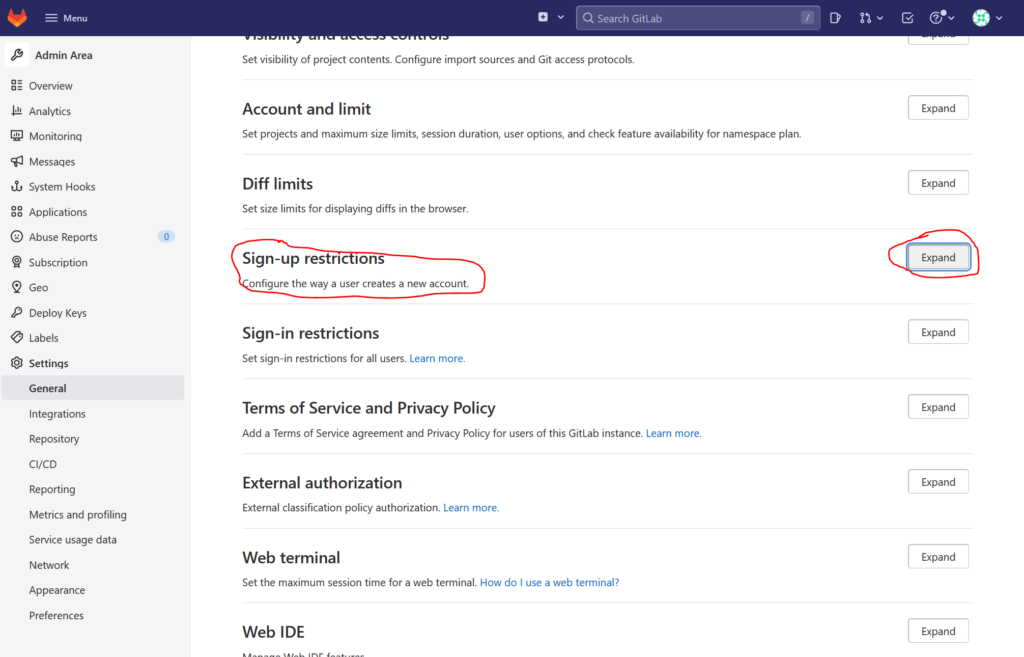
Open the main menu by clicking on „menu“ in the left corner of the page and then on „Admin“. In the left menu bar click on „Settings“. Look for the „Sign-up restrictions“ and click „Expand“:
Now in the expanded section click on the checkbox next to „Sign-up enabled“ to uncheck it:
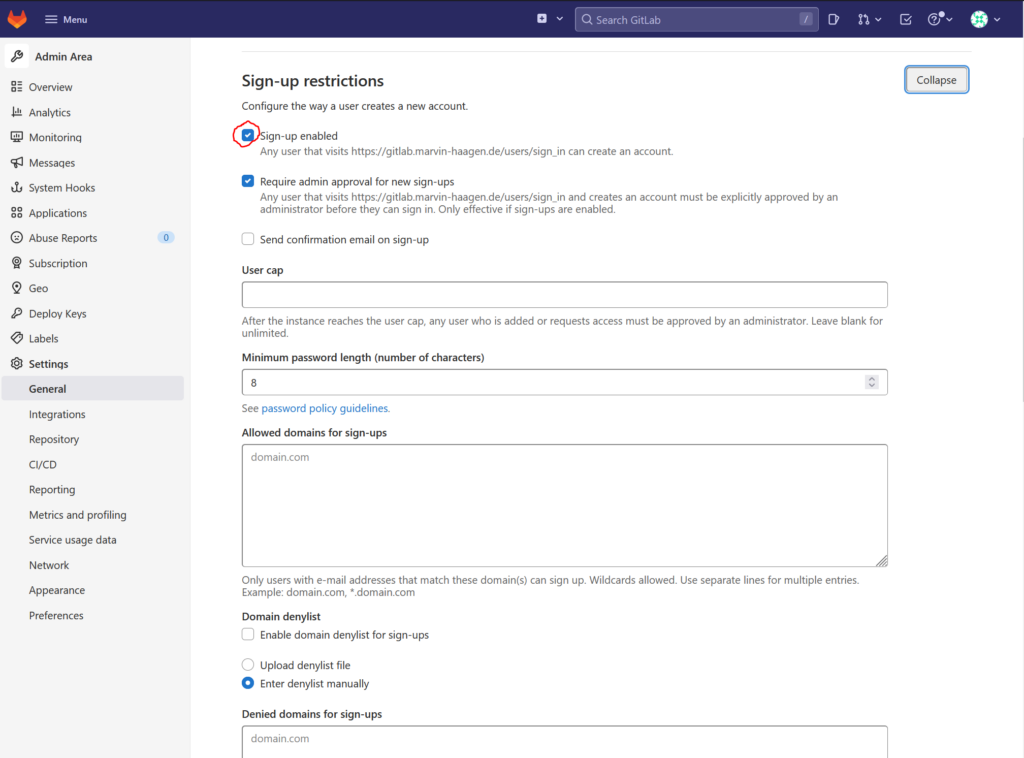
Scroll down to the „Save changes“ button and click it. Now the Sign up page is disabled.
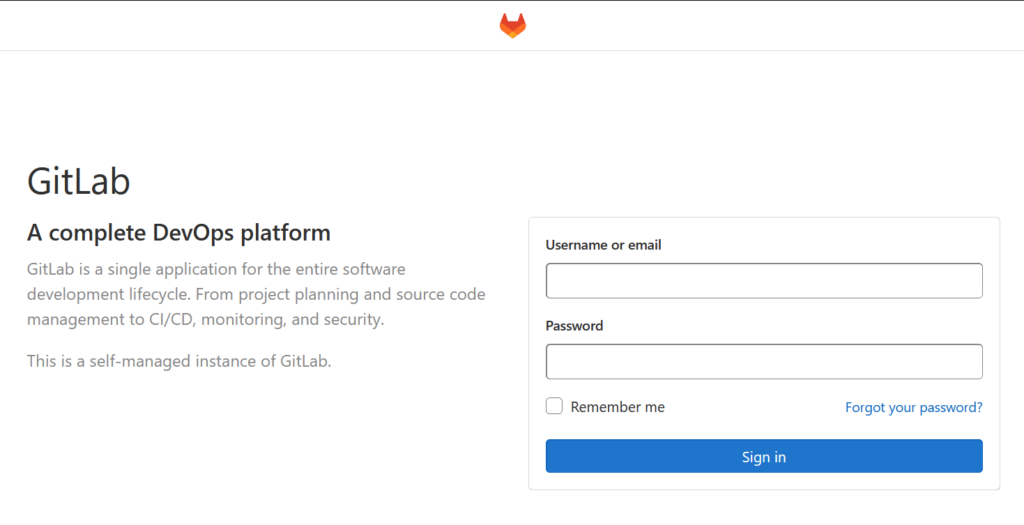
To verify that it works, logout of your account and refresh the page. Now there should be no registration link anymore:
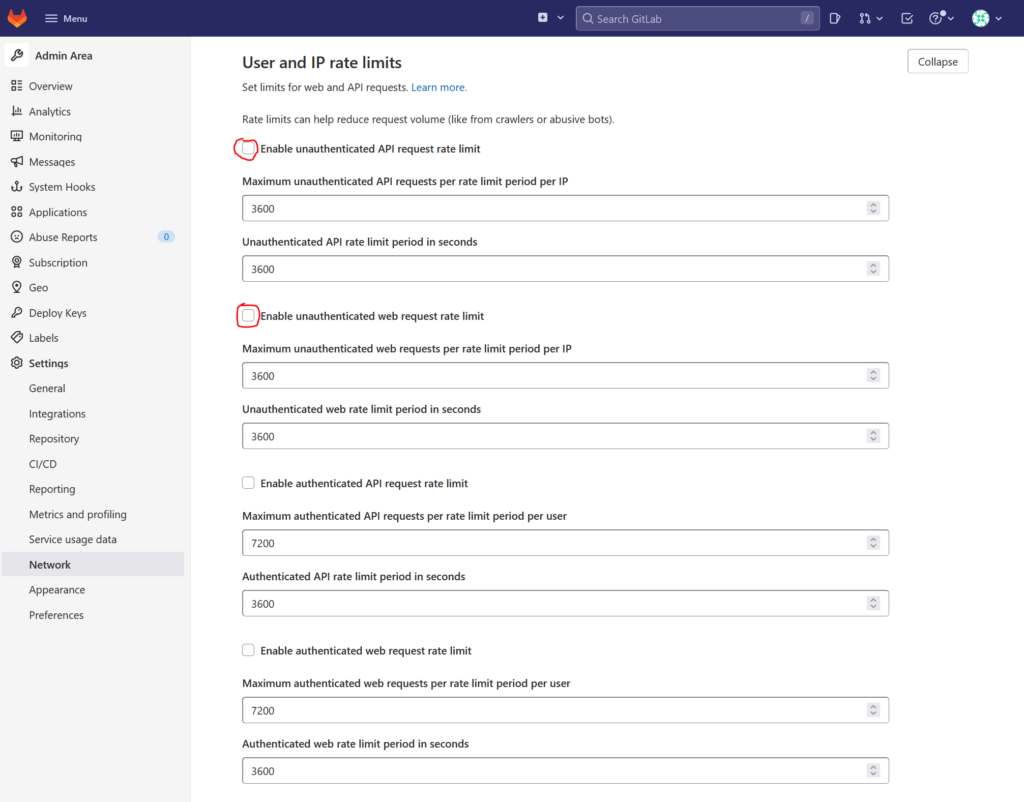
Set rate limit and activate Two Factor Authentication
To slow down Brute Force and Dictionary attacks and to prevent DoS attacks you should set a rate limit for unauthorized users.
Open the main menu by clicking on „menu“ in the left corner of the page and then on „Admin“. In the left menu bar click on „Settings“ and then on „Network“. Set the checkboxes next to „Enable unauthenticated API request rate limit“ and „Enable unauthenticated web request rate limit“ and then click the „Save changes“ button further below:
Now click in the left menu bar on „General“, look for the „Sign-in restrictions“ section and expand it. Set the checkbox by „Enforce two-factor authentication“:
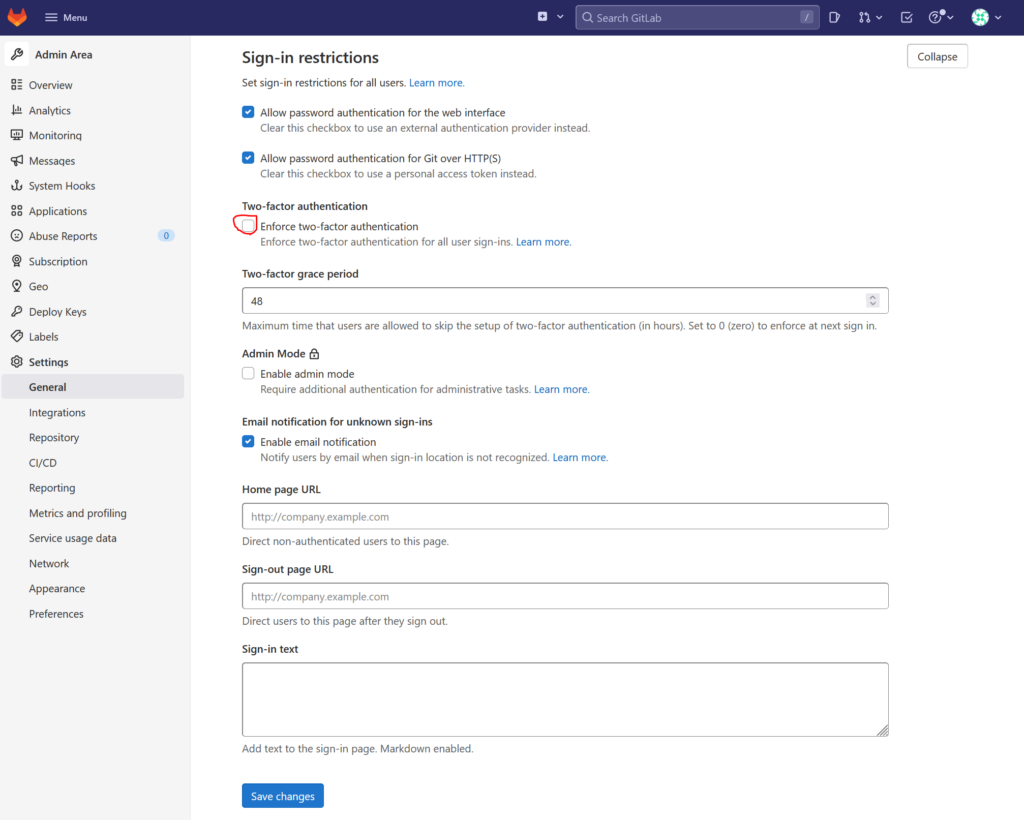
Set the „Two-factor grace period“ to 0 and then click „Save changes“. Keep the window open and open a new window in private mode, so that you can login as another user at the same time. This would allow you to disable enforcing Two Factor Authentication if you notice that something goes wrong by setting it up for the other user.
Within that private window login as the normal user account that you have created in the previous steps. After the successful login you are requested to set up Two Factor Authentication:
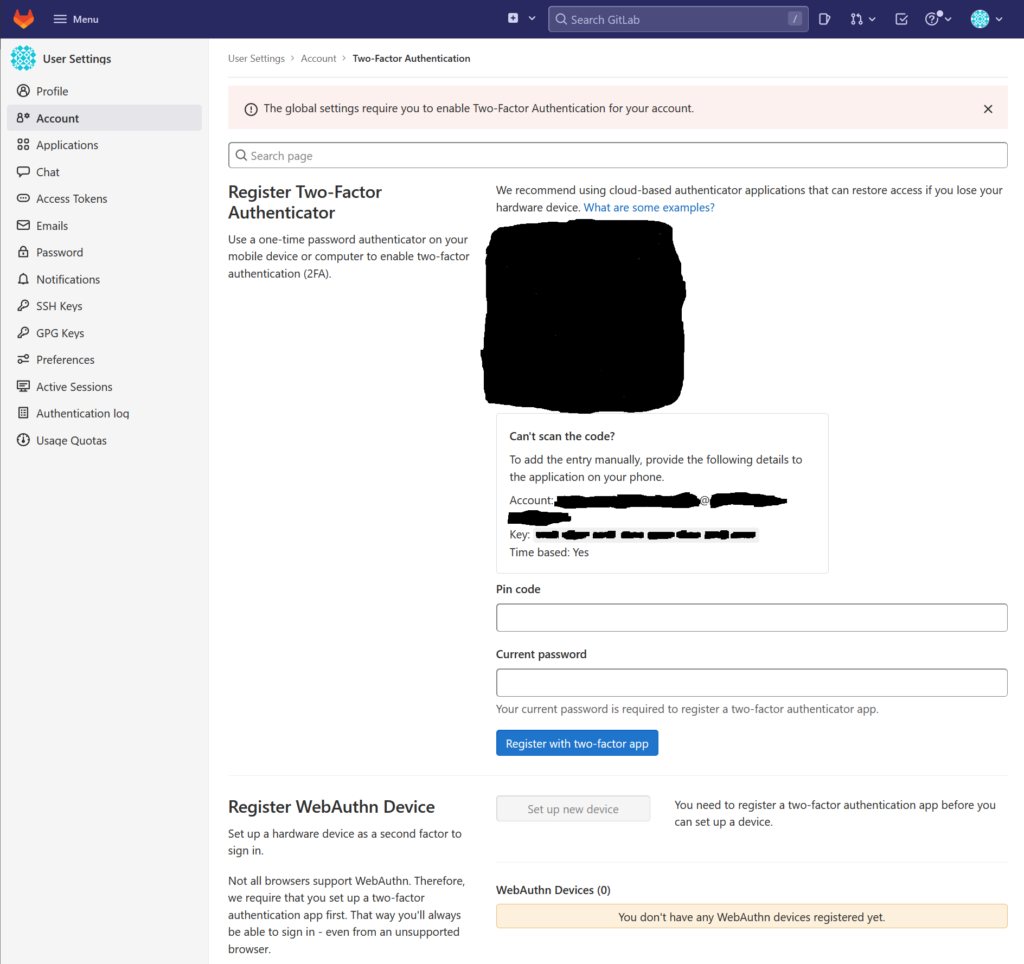
Scan the displayed QR code with your Authenticator app and enter the code your application shows into the Pin code field.
Also enter your password into the password field, then click „Register with two-factor app“.
Gitlab then shows you a list of one-time codes that can be used to recover your account if your device gets lost. You should save or print them.
To check that everything is set up correctly, logout and try login again. You now should be requested to enter the code of the registered Authenticator app.
Signout and repeat the Two Factor Authentication setup for your Gitlab root account within the private window. Check if you can correctly login with your registered Authenticator app. If yes logout and close the private window.
Set up API key for your user account
To be able to push commits from your IDE to your repository you now need to setup a personal access token for your normal user account.
Login with your normal user account and open the user menu:
Click on „Edit profile“. Now in the menu on the left click on „Access token“ to open the Personal Access Tokens page. Here enter a name for the token and check write_repository:
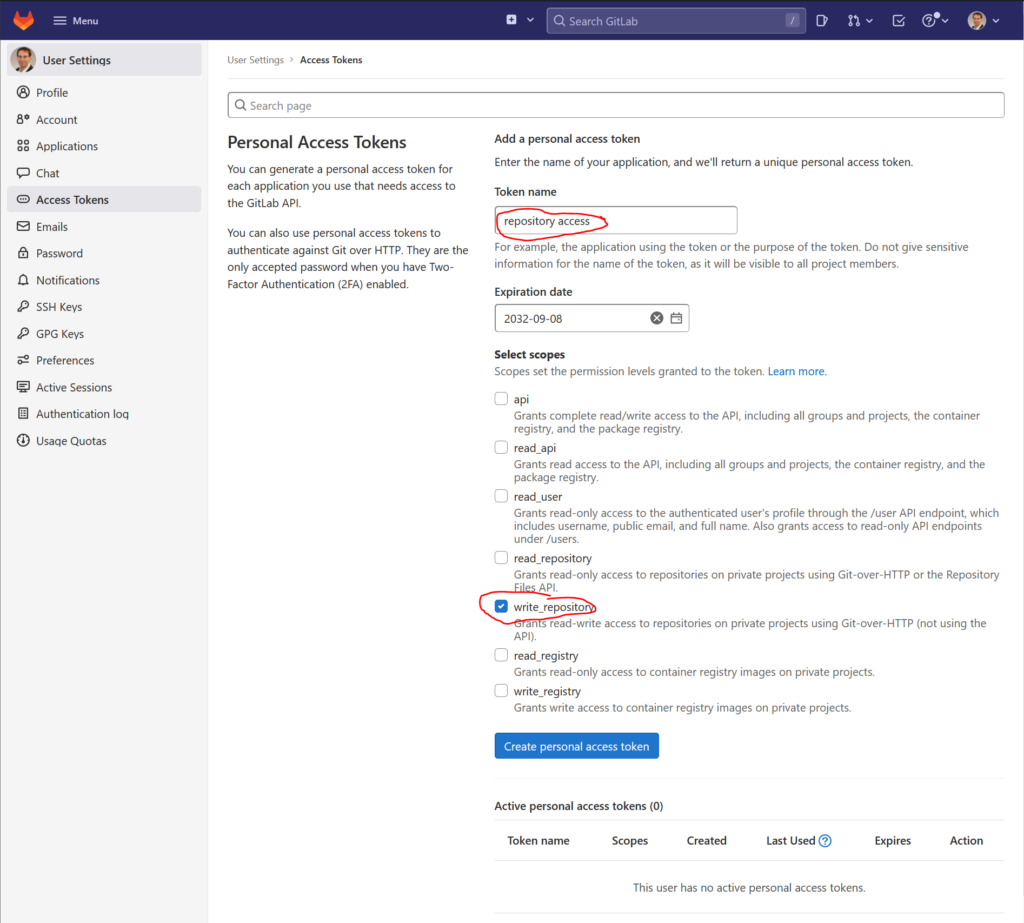
Now click on „Create personal access token“ to create the token.
Setup a runner
To be able to run the CI/CD pipeline you need to setup a runner for your Gitlab. You can use the Gitlab Runner Docker image.
Runner installation
Navigate to the directory where you want to store the runner config in:
cd /srv/gitlab-runnerCreate a .env file within that folder with following content:
GITLAB_RUNNER_HOME=/srv/gitlab-runner
Now also create a docker-compose.yml file with following content:
version: '3.6'
services:
  web:
    image: 'gitlab/gitlab-runner:latest'
    container_name: gitlab-runner
    restart: always
    volumes:
      - '$GITLAB_RUNNER_HOME/config:/etc/gitlab-runner'
      - '/var/run/docker.sock:/var/run/docker.sock'
Start the runner:
docker compose up -dRegister the runner
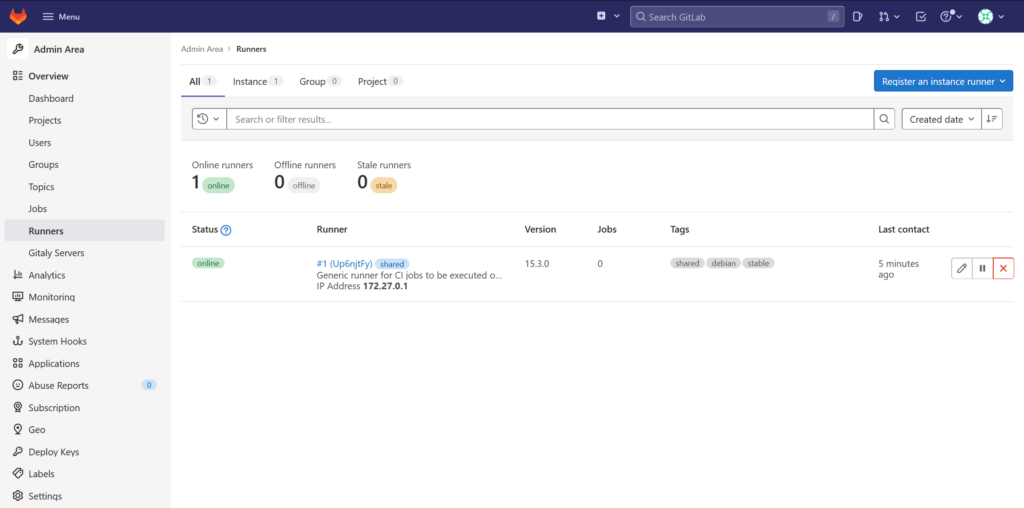
Now sign in as root into your Gitlab webfront and go to the Admin Area. Click on „Runners“. You should now see following page:

Click on „Register an instance runner“ and copy the registration token to the clipboard.
Now executed following command on the command line to start the runner registration:
docker run --rm -it -v /srv/gitlab-runner/config:/etc/gitlab-runner gitlab/gitlab-runner registerYou are requested to enter the instance URL. That is the base URL of your Gitlab installation. As in my example I have set the Gitlab hostname to gitlab.marvin-haagen.de, the instance URL is https://gitlab.marvin-haagen.de.
Now paste the registration token that you previously had copied to the clipboard.
Also enter a description for the runner so that you know what it is for. You can change the description later from within the webfrontend.
You are requested to enter the tags for the runner. With that CI/CD tags you may enter you can control what type of CI/CD jobs the runner can be used for. These tags can be used within the .gitlab-ci.yml files to select which runner to use for run the job. A runner must have all tags specified in the .gitlab-ci.yml file to be selected. For more details see the Gitlab documentation about CI/CD tags.
You can now enter a maintenance note.
You are now asked to select an executer for the runner. I suggest to enter „docker“ here
Now enter the default Docker base image for the runner. A projects .gitlab-ci.yml can override the base image setting of a selected runner.
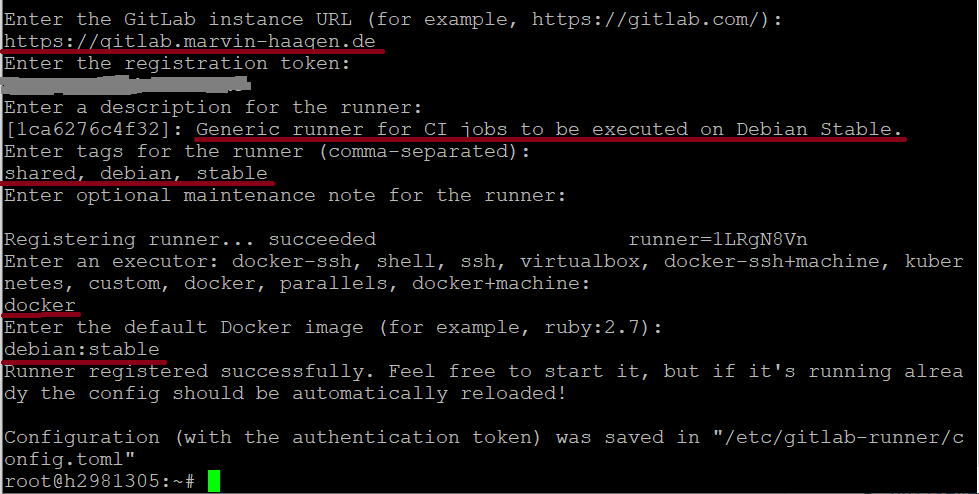
Now refresh your runner configuration page. You should now see the runner you have added:
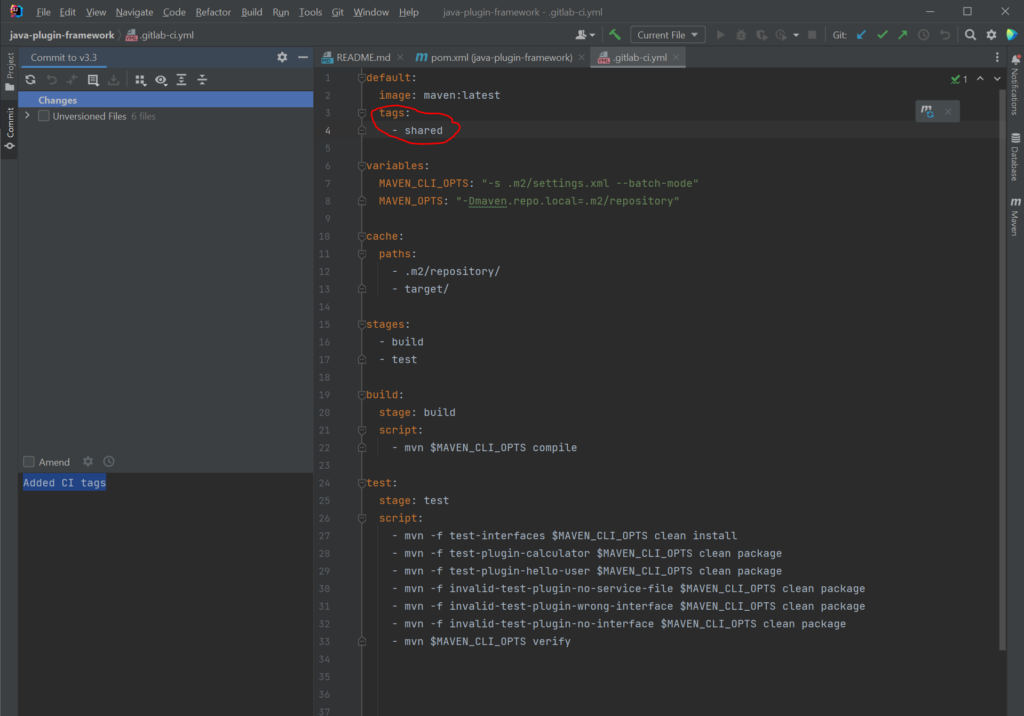
Add CI tags to your projects
You should provide CI tags to your project. For this, add the tags section containing your tags to each job within the .gitlab-ci.yml file of your project:
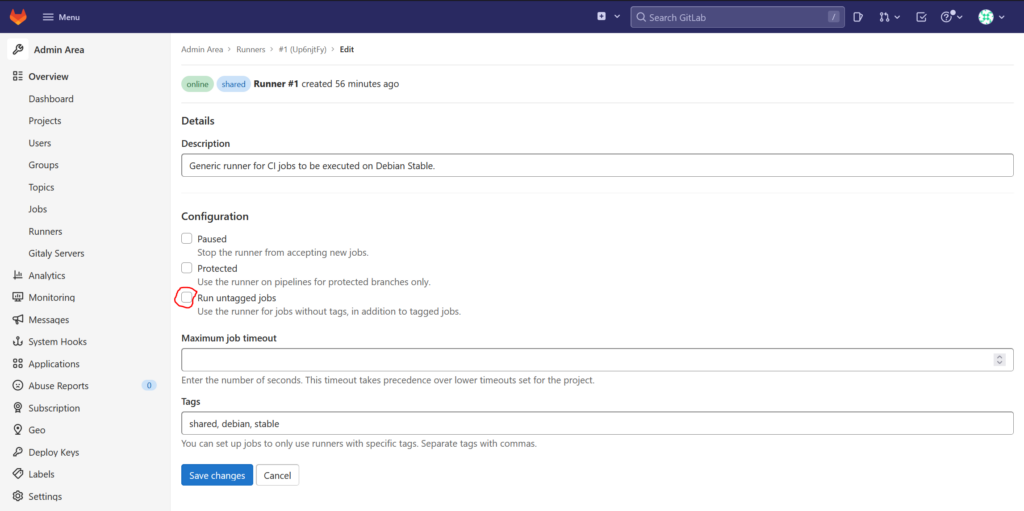
Allow untagged jobs
Per default, your runners will only pick up jobs that have CI/CD tags. If you want to enable the runner to pick up untagged jobs, click on the pencil symbol right next to the runner. This opens the configuration page of that runner and click on the checkbox „Run untagged jobs“ to enable it:
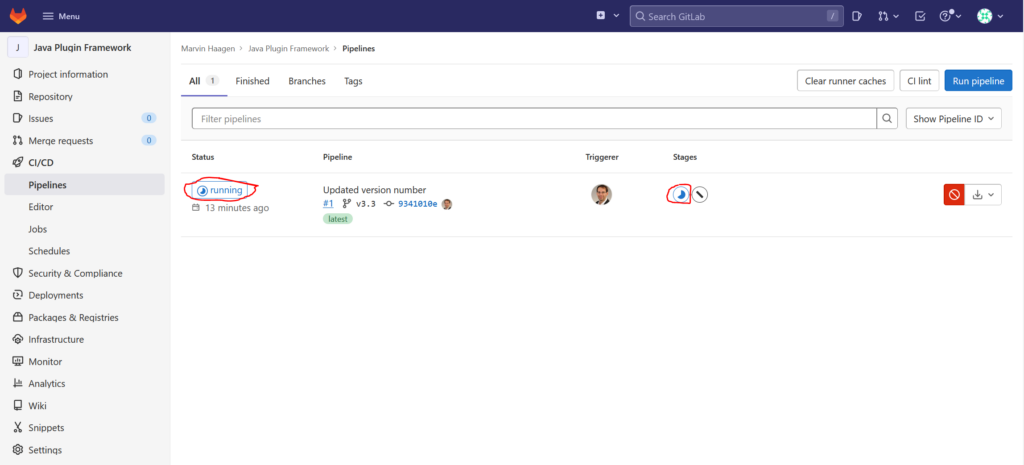
Now you can navigate within the webfrontend to one of your projects and click on the left menu on „CI/CD“ and then on „Pipelines“. You should now see that your project is going to be build:
Keeping Gitlab up to date
For updating Gitlab you only need to pull the new image version of Gitlab and Gitlab-Runner from the Docker hub and then restart the Gitlab and Gitlab-Runner container. As you probably don’t want to do this manually, you should set up your server to automatically update the containers if a new version is available.
Switch to the folder where you placed your Gitlabs docker-compose.yml file:
cd /srv/gitlabHere create the file update-gitlab.sh with following content:
#!/bin/bash
LOGFILE=update-gitlab.log
cd "$(dirname "$0")"
echo "Logs:" > $LOGFILE
echo "Working directory set to $(dirname "$0")" | tee -a $LOGFILE
echo "Pulling Gitlab image" | tee -a $LOGFILE
docker compose pull 2>&1 | sed 's/^/  /' | tee -a $LOGFILE
echo "Refreshing container" | tee -a $LOGFILE
docker compose up -d 2>&1 | sed 's/^/  /' | tee -a $LOGFILE
{
  echo "Subject: [Gitlab] Gitlab update report"
  echo ""
  echo "$(cat $LOGFILE)"
} | sendmail -f "Gitlab <root@$$HOSTNAME$$>" $$RECIPIENT$$
Replace $$HOSTNAME$$ with the hostname of your Gitlab server and $$RECIPIENT$$ with the mail address to send the update log to.
Set x bit of the file to make it executable:
chmod +x update-gitlab.shNow test run your script:
./update-gitlab.shYou now should have received an email containing the log.
Now copy the file to the folder where you placed your Gitlab runners docker-compose.yml file:
cp update-gitlab.sh /srv/gitlab-runner/update-gitlab-runner.shGo to the folder where you placed your Gitlab runners docker-compose.yml file and within its update-gitlab-runner.sh add the word „runner“ behind all text occurances of „Gitlab“. The resulting content should look like this:
#!/bin/bash
LOGFILE=update-gitlab-runner.log
cd "$(dirname "$0")"
echo "Logs:" > $LOGFILE
echo "Working directory set to $(dirname "$0")" | tee -a $LOGFILE
echo "Pulling Gitlab Runner image" | tee -a $LOGFILE
docker compose pull 2>&1 | sed 's/^/  /' | tee -a $LOGFILE
echo "Refreshing container" | tee -a $LOGFILE
docker compose up -d 2>&1 | sed 's/^/  /' | tee -a $LOGFILE
{
  echo "Subject: [Gitlab Runner] Gitlab Runner update report"
  echo ""
  echo "$(cat $LOGFILE)"
} | sendmail -f "Gitlab <root@$$HOSTNAME$$>" $$RECIPIENT$$
Again replace $$HOSTNAME$$ with the hostname of your Gitlab server and $$RECIPIENT$$ with the mail address to send the log to.
Also set the x bit for update-gitlab-runner.sh to make it executable and then test run it. Check if you have received the email containing the log.
Now open your /etc/crontab and append following lines to shedule the update scripts to be executed once every day:
  0  3  *  *  * root      /srv/gitlab/update-gitlab.sh
  0  3  *  *  * root      /srv/gitlab-runner/update-gitlab-runner.sh
You should receive two emails with the update logs at the next day around 3 am.
As the Gitlab team usually releases updates around the 22nd, your Server will be down only once per month for a few minutes.